Have you ever wondered why there’s a nearly infinite variety of coffee mugs designs these days?
It is because more and more people are buying a mug press and churning out their own designs.
Pressing custom designs on mugs is an awesome gig for you if you want to indulge in a new hobby, or if you’re who is always full of design ideas or if you want to start a new business.
But first, you must know how to use a mug press before you can plunge yourself into the endless design possibilities.

In this post, you will learn how to use a mug heat press machine. We will also provide you with some tips for perfect heat transfer on mugs, temperature guides on common HTV on mugs, and ways to maintain the mug heat press machine.
What is a Mug Heat Press Machine?
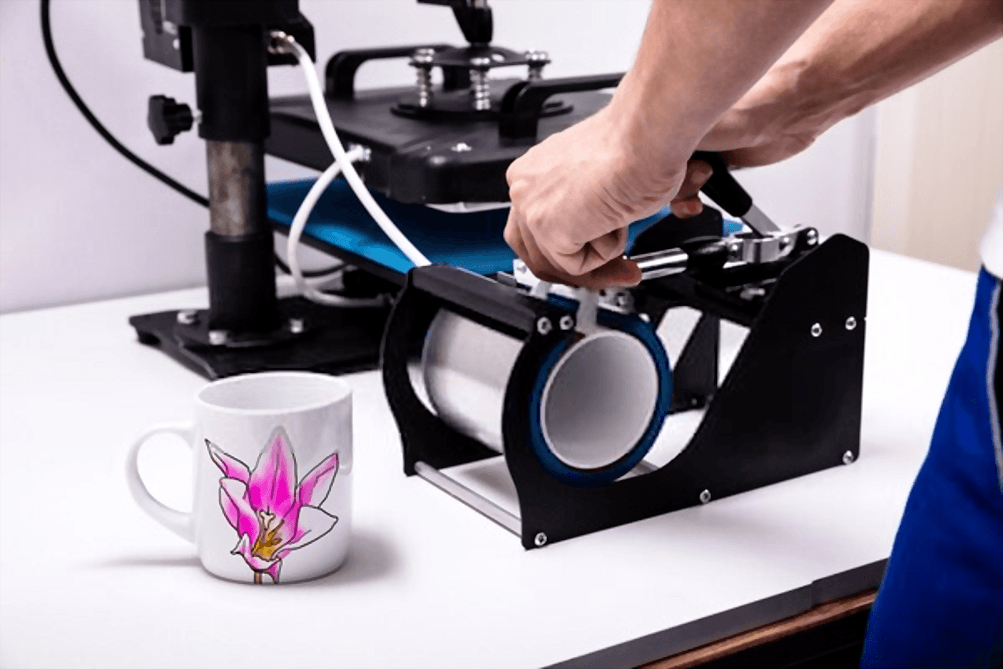
A mug heat press machine is created to print your artwork on a mug. With this unique machine, you can make a clear, crisp, full-color image on a coffee mug.
Note that you cannot print on all mugs. So, look out for mainly coated ceramic mugs.


These days, there are digital mug heat press machines that are far easier to use. Digital mug heat press machines will transfer images and decorate your mugs digitally with the help of its accurate heating, digital temperature, and time control.
You can press assorted images of different materials on mugs and adjust mug sizes digitally using a knob.
How to Use a Mug Press Machine
To make quality prints on mugs, the first thing you need to do is to select a good mug press. We recommend selecting a digital mug press because they help you create vivid images on your mugs more accurately and are easier to use.
After selecting a good mug press, you can follow the step by step guide below to use a mug press.
Step 1: Get an Image
Use graphic design apps like Photoshop, Paint, and Illustrator software to make the designs for the mug on your computer.
Alternatively, you can buy an image or mug graphic design from a craft store to save time. This is especially helpful if you’re not proficient in the use of graphic design apps.
Step 2: Print the Design with an Inkjet Printer


Print the graphic design using an inkjet printer like Ricoh or Epson. Use a sublimation ink and top-quality sublimation paper to print out the image you designed or bought in step 1.
Get help from sellers of heat press machines for inkjet printers to use if you don’t like the brands we mentioned.
Step 3: Place the Paper on the Mug
Now that you have printed the image, get a thermal tape, and use it to fix the image onto the surface of the mug carefully.
Make sure the sublimation paper with the image on it is completely dry before you place it on the mug.
Step 4: Preheat the Heat Press Machine
To preheat the mug press, turn it on and raise the temperature to 100°C for ten to twelve seconds.
Next, place the mug inside the mug frame and make sure it is firmly in place. Now, increase the temperature to 325°C and time the heating process for four minutes.
Note that the heating temperature and the timing may vary depending on the heat press machine and material you are using. So, consult the suppliers manual for the specific heat press machine or material that you are using.
Step 5: Bring out The Mug
After the timer goes off, bring the mug out of the mug frame and let it cool down for 5 minutes. Next, peel off the thermal tapes and carefully remove the sublimation paper.
That is all! You have just printed your first mug with a mug heat press machine.
Tips for Perfect Heat Transfer on Mugs Using HTV
Whether you are using an HTV or outdoor vinyl to do the transfer of your artistic image unto the mug, you must be careful. However, transferring outdoor vinyl is harder to do than HTV.
For outdoor vinyl, you must beware of bumps and make sure you position the vinyl on the exact place you want the image to be on the mug.
But for HTV, it is easier to work with wear off easily compared to outdoor vinyl, and you can reposition it many times on your mug before you heat press it. When you heat press it, the vinyl will melt into place so you don’t have to worry about bumps.
The following guide will help you to transfer the design on mugs using HTV:
1 – Cut the Vinyl


Create your cut out design on your computer, scale it according to the size of your mugs, and transfer it to the vinyl cutter to cut out the design.
Place the HTV you bought into your vinyl cutter and cut out the design according to the size of your mug. If it is a standard mug of 11oz, cut the vinyl at 4 inches across or 3.7 inches at the least.
Note: Make sure you measure and scale the vinyl before you cut it. If the mug is large, increase the size of the vinyl.
2 – Set up the Heat Press Properly
Depending on the size and the type of heat mug press you bought, you should keep it in a place where you have enough room for easy movement.
Also, keep it where you can gain access to it easily to press mugs and for quick storage after using the machine.


3 – Prepare Your Mugs
Wash the mugs you want to press and dry them carefully. Clean the area you want to place the vinyl.
Swab it with a cotton cloth using alcohol to erase any trace of debris on the surface of the mug, and then place the vinyl on the mug and press it firmly on to the mug.
4 – Press
Wear an oven mitt, and gently confirm that the tension on the mug attachment is firm. Next, place your mug in the press with the handle up and raise the press lever to close it around the mug.
Also, check if the mug is held tightly in place in the heat press, by shaking it to see whether it is moving.
Make sure it is firm in the mug frame, then set the temperature and time. Since you are pressing mugs, with HTV, set the temperature to 360°F.
Next, set the timer to 30 seconds. Depending on the type of heat press machine or the HTV material, start by:
- Pressing SET
- Use the up or down directional arrow buttons to set the temperature
- Next, press SET
- Also, use the up or down directional arrow keys to set the time in seconds
- Finally, press SET a final time to commit the program into the machine’s memory
- When the pressing ends, you will hear a buzz of the timer
- Turn off the machine and unplug it from electricity if you are pressing only one mug. Be careful; it is hot.
- Gently remove the lever holding the Mug in the mug frame and allow it to cool down.
- After the Mug has cooled enough, peel off the protective plastic from the vinyl.
Temperature guides on common HTV on mugs
If you are wondering what temperature you should use to heat press a common HTV on mugs. You can set the temperature to 360°F and time at 30 seconds. But the time varies according to the type of press and material you are using.
So, always check the description of the material and follow the manufacturer’s guide on the heat requirements.
Ways to Maintain the Mug Heat Press Machine
You can enjoy your investment and make your heat-press last longer by carrying out proper and regular maintenance of your mug press.
Follow the steps below to protect your investment and make sure your mug press works at its peak installation capacity.
Make the Workplace Clean
Keep the place where you use the heat press clean and neat always.
Bits of lint, hair, and other trash can get stuck in the mug during the transferring period, and affect the quality of your job, so keep the place clean always.
Dust
Clean the machine often, to prevent it from running hotter due to dust that builds upon it over time.
Cover the machine with a piece of clean cloth when not in use to keep dust away from the inner and outer parts of the machine.
Lubrication
Use a cotton swab to apply a high heat resistant lubricant to heat press.
To make the lowering and lifting of your platen smoother, apply white grease to the piston and rod of your machine. Do this at least once in a year.
Clean the Heat Platen
When the heat press is cool, clean the heat platen with alcohol, iron cleaner or mineral spirits. The number of times you clean depends on how frequently you use the press.
Change the Rubber Parts of the Heat Platen
Replace rubber part of the heat platen when you notice that it is cracked, deformed, or warped. To transfer with even pressure, the machine must have a smooth surface. It is cheaper to replace the parts than buy a new heat press.
Cord
Use the right cord for the machine if you replaced the one that originally came with the machine.
Make sure the wattage and voltage are right to prevent the risk of a fire outbreak or damage to the machine internals.
Use Teflon Sheets/Covers
To safeguard your heat platen and make them last longer, use Teflon sheets to cover the heat platen. Use Teflon sheets to cover your transfers to stop them from sticking to the heat platen of your press.
Conclusion
In this article, we have explored how to use a mug press efficiently. We also discussed tips for perfect heat transfer on mugs using HTV, temperature guides on common HTV on mugs, and how to maintain your mug heat press machine.
Now that you know how to handle a mug press, why not read our mug press reviews to select the right one for you or your business?


Can you use a mug press to seal waterslide decals on mugs
Hi Pappy,
While mug presses are fantastic tools for heat-transferring designs onto mugs, they’re not the ideal choice for sealing waterslide decals.
Waterslide decals need to cure at around 230°F (110°C) for 15-30 minutes, depending on the product. But mug presses often reach much higher temperatures (350°F-400°F) and have shorter timing (30-60 seconds). This mismatch can lead to burnt, discolored, or bubbly decals.
Moreover, waterslide decals need gentle pressure and a smooth application to stick properly. But the high pressure from mug presses during the transfer process could wrinkle or damage the decal film.
So, keep your mug press for heat transfers, but when it comes to sealing, trust your acrylic sealer spray or clear epoxy.