Navigating around a sewing machine takes time for you to memorize every parts and function of the tailoring equipment.
Knowing everything by heart would help you become efficient in your sewing skills.
Using a machine for the first time might take some difficulties especially for the beginners, the main question here now is how to use a sewing machine for the first time?
Actually, you don’t need to enroll in a home economics school or attend a vocational class just to learn sewing and using a machine.
All you have to do is to follow these easy and practical steps as your guide for a starter like you.
Guidelines on How to Use a Sewing Machine
1. Getting to Know All the Parts and Functions of The Sewing Machine
Identify first the relevant parts of a sewing machine before using it.
You must have the initial knowledge so that you will be directed to the proper way of initiating a sewing machine and to produce a voguish textile.
Here are the fundamental parts and functions of a sewing machine:
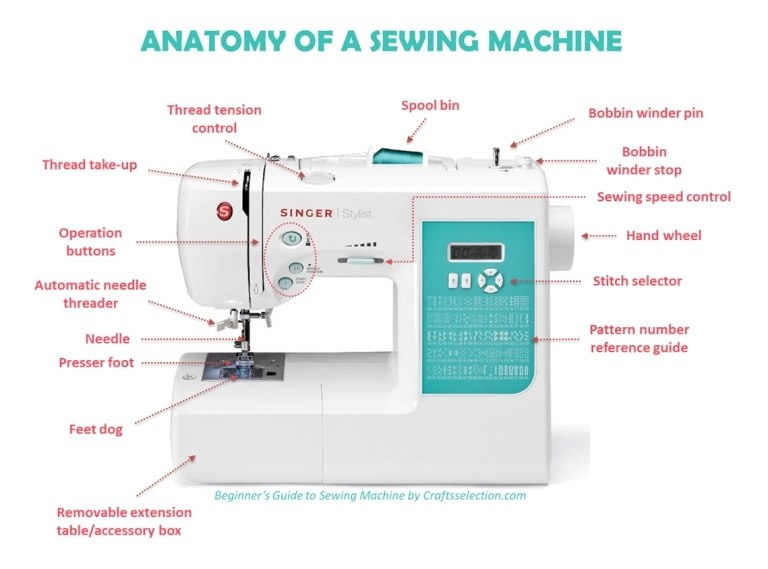

The Parts and Functions of a Sewing Machine
- Needle – a sewing machine’s needle contain a larger hole than an ordinary needle. It is positioned below the presser foot
- Spool pin – this part holds the bobbin and supply thread strand on the fabric needlework. It is merely found on the top of the sewing machine
- Bobbin winder – the thread will stop upon reaching the optimum capacity especially if the bobbin has no more thread to circulate on the sewing machine
- Thread guide – the part that supports the flow of the thread from the bobbin up to the presser foot then eventually to the needle
- Thread take-up – the strand of the thread will pass onto this piece and helps the thread to move up and down
- Presser foot – this is lowered when the user starts to sew and it holds the textile firmly so that stitching will be easy and stable
- Presser foot lifter – it is a lever that helps the presser foot to lift up and push down
- Balance wheel – this round part helps the needle to raise and set down
- Foot pedal – In partnership with the balance wheel, the foot pedal is used to exert power during stitching
- Bobbin case – a container of the bobbin to protect it and smoothly let the thread strands flow
- Plate cover – a part of the sewing machine that slides to keep the bobbin in place
- Feed dog – it supports the textile and stitching by pulling the fabric
- Stitch width regulator – it controls the zigzag effects of the stitches
- Stitch length regulator – it controls the measurement and consistency of the stitch
- Reverse lever – it helps the needle to sew in reverse as the lever is pushed on
Read more: Beginner Guide to Sewing Machine Needles
2. Set Up the Thread Onto Your Bobbin
After knowing all of the basics, you may freely execute now the next step which is the proper way of threading the bobbin.
- You must slide the thread going to the spindle then slide the piece right after the threaded part
- Stretch out a strand of thread and push it through the thread holder to handle the strand
- Move to the thread on the circular piece and place the end part of the thread through the bobbin
- Thereafter, put the bobbin on the spindle so that it will hold the bobbin while setting up the thread to be used on the sewing session
- Next, look for the foot pedal to measure the length of the thread that you’ll be needing for your tapestry project. Just press the foot pedal to have your desired length of thread
- Finally, cut the strand and prepare your bobbin on the sewing machine
Find out: Top-Rated Sewing Machines For Beginners
3. Supply the Thread on Your Sewing Machine
After fixing and preparing to thread the bobbin, you may now proceed with the bobbin to put it on the bobbin case then close the plate cover.
Set up the needle on the sewing machine by turning the handle; thereafter, the needle and bobbin thread will work on together.
Be sure to check if the thread flows on the bobbin winder up to the presser foot in a smooth motion.
You’re now ready to begin your first ever needlework project!
